How to Identify Your Plate Heat Exchanger Model Without a Nameplate
Aiprel
professor
A gasketed plate heat exchanger that has lost its nameplate is not unidentified. It is undocumented. The metal still carries the answer — in four places on the unit, and in five dimensions you can take with a caliper, a tape and a protractor.
Nearly every enquiry opens the same way: a photo of a bare frame and the question “what model is this?” That photo is almost never enough, because frames from one maker look alike across a whole size range. What works is twenty minutes with the pack open and a fixed order of measurements — port centre distance first, because it eliminates the most candidates, plate outline second, because it is the easiest to get wrong, corrugation last, because it decides whether the new part merely fits or actually performs.
If you already know the series and only need the wear parts, our spare parts library is organised by brand and plate family. If you do not, work through the five measurements in order. Measuring the corrugation first is the most common way to waste a week.
Before you measure, look
Four places on a unit carry the model. Each takes under five minutes, and any one of them can end the exercise.
The plate corner stamp. Every plate we have handled carries the maker’s mark and plate type stamped into one corner, outside the gasket groove, usually within 20–30 mm of the edge. The characters are shallow — around 0.2 mm — and two coats of paint or a season of calcium will bury them. A pencil rubbing, or a torch held almost parallel to the surface, recovers them more often than people expect. Work on a plate from the middle of the pack; the end plate is usually the most corroded.
The gasket. Most gaskets carry the model and the compound moulded into the inside face near a corner. Rubber takes a deep impression and keeps it long after the plate stamp has gone, and it tells you the elastomer at the same time — which the stamp does not. If the gasket is legible but perished, a replacement gasket can be quoted from that number alone, without opening the pack.
The carrying bar, the bolt ends, the paperwork. Some makers stamp the model into the top carrying bar or the end face of the tightening bolts — two minutes to rule out. The purchase order, duty sheet and maintenance log are boring and by far the most reliable source when the unit was bought new; purchasing archives outlive nameplates by a decade. Ask whoever placed the order before anyone else.
Only when all four come up empty do you need the measurements. Write everything on one sheet as you go, and photograph each dimension with the caliper still in place — that shows the supplier exactly where you put the jaws.
Measurement one: port centre distance
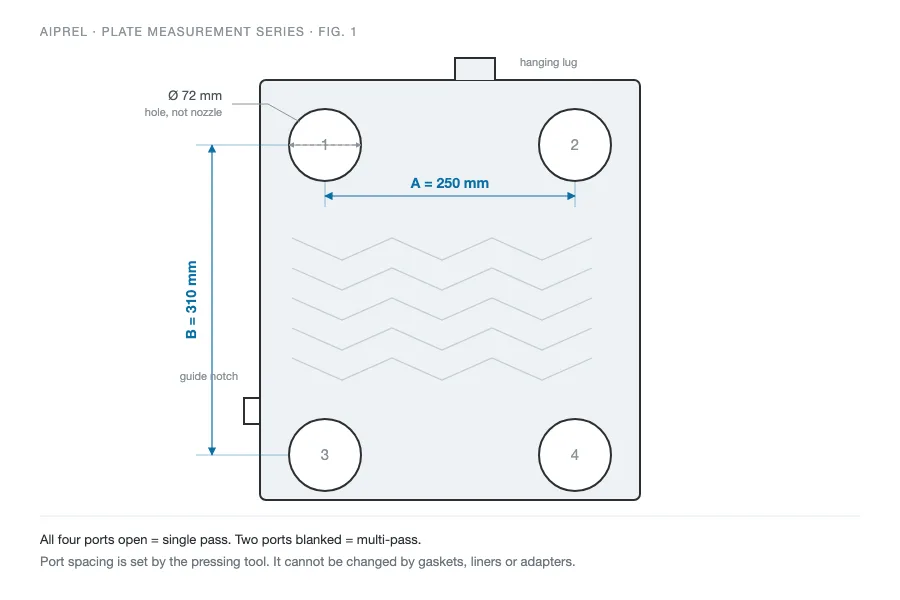
The four ports sit at the corners of a rectangle. Measure the horizontal distance between two port centres (A) and the vertical distance (B). These two numbers are the most useful thing you can send a supplier, because port spacing is set by the pressing tool and cannot be altered afterwards by gaskets, liners, flanges or adapters. Change the gasket and the plate still fits. Change the port spacing and it is a different plate.
Measure on a plate, not on the frame. On the frame you are measuring the outside of a liner or studded connection, which adds 3–10 mm per side and quietly turns a correct size into a wrong one. If the unit is assembled and no plate will come out, measuring between connection centres gives a rough figure only — enough to order a sample, not fifty plates.
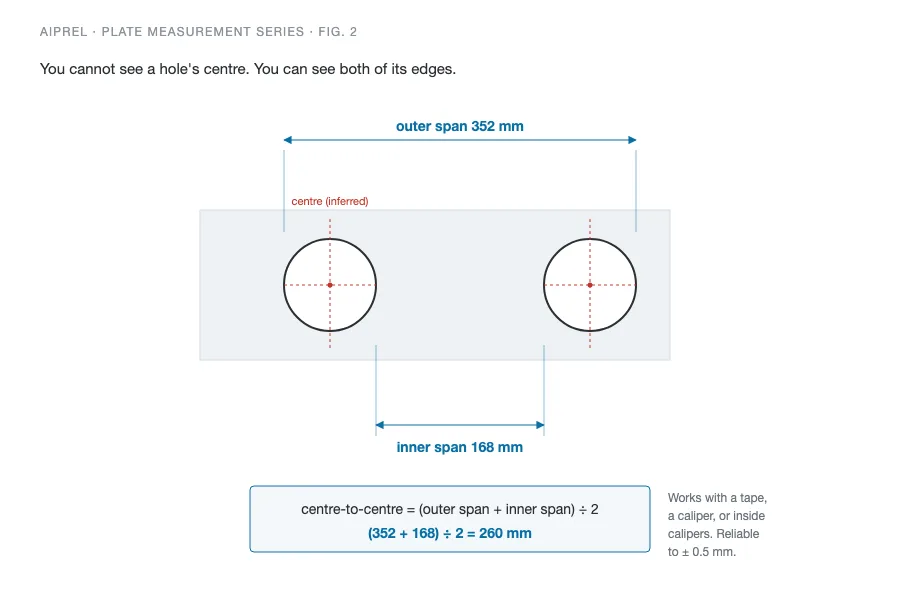
You cannot see the centre of a hole, but you can see both edges. Measure across the outside of the two holes, then across the inside, and average:
centre-to-centre = (outer span + inner span) ÷ 2
Two holes 76 mm in diameter and 336 mm apart centre to centre read 412 mm outside and 260 mm inside. Average them and you are back at 336 mm without ever guessing where the middle is. The method works with a tape, a caliper or a pair of inside calipers, and it is why a figure taken this way can be trusted to half a millimetre.
Read the tolerance properly. Port spacing is a fixed tooling dimension, so ±1 mm shortlists a size and ±0.5 mm places an order. A 2 mm difference is not measurement error. It is a different plate.
While you are at the ports, note the pattern: four open holes, or two open and two blanked. That tells you whether the unit is single-pass or multi-pass, and a plate with the wrong corner pattern will drop into the frame and then fail to seal.
Measurement two: port hole diameter
Measure the hole in the plate, not the nozzle. A 4-inch connection regularly sits on a plate with a 100 mm port hole, and the same connection size appears on plates with 150 mm holes. The nozzle was chosen by whoever built the skid; the hole was chosen by the pressing tool.
Take two readings at 90° to each other. After a few years of erosion the hole is often no longer round, and the smaller reading is the one that matters, because that is what the gasket has to seal against.
Nominal port sizes run from DN25 to DN400 (1 to 16 inch) on gasketed units. This dimension is fit-critical: a plate with the right outline and the wrong port hole has nothing for the gasket to seat on, and no amount of tightening will stop it weeping.
Measurement three: plate outline
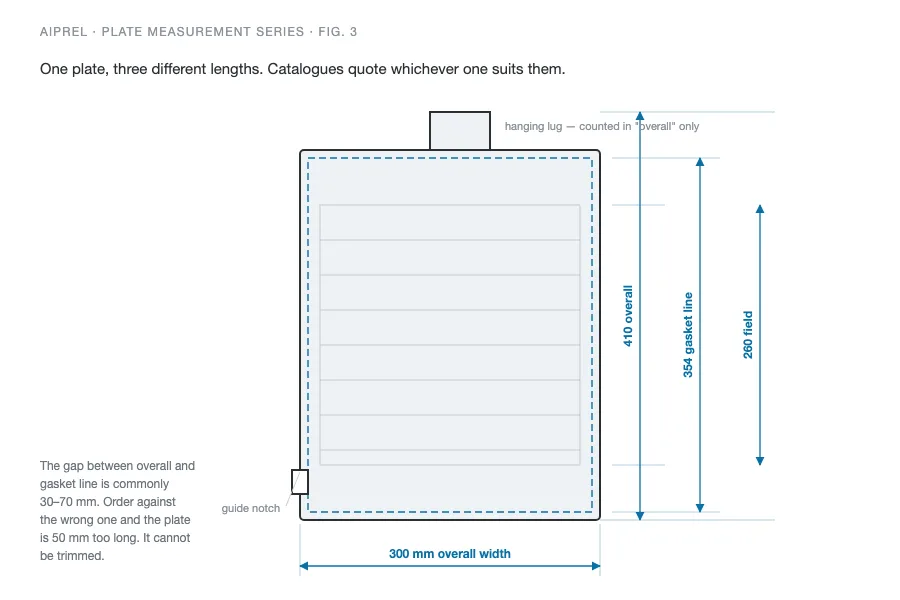
This is where most self-measured enquiries go wrong, and it is not the customer’s fault. Catalogues quote plate length in at least three ways, and the numbers differ by more than the tolerance on the part.
Overall length, including the hanging lug at the top.
Gasket-line length, from the outside of the gasket at one end to the outside at the other.
Corrugation field length, the pressed area only, excluding the distribution zone at both ends.
The gap between the first and the second is commonly 30–70 mm, and more on large plates. Send the overall length when the supplier’s table is on gasket-line and you will be quoted a plate 50 mm too long. It cannot be trimmed, and it will not fit between the frame plate and the pressure plate.
So measure all three and label them. Do the same in the width direction: overall width, and gasket-line width. Lay the plate flat on a bench with the gasket off, and run the tape along the plate edge rather than across the corrugation, where it bridges the ridges and adds 3–5 mm.
Two more features are worth recording because they separate models that otherwise measure the same: the position of the hanging lug, and the position of the notch on the guide-bar side. Neither is adjustable, and a plate with the notch in the wrong place will hang at an angle and leak at the bottom corner.
Measurement four: plate thickness
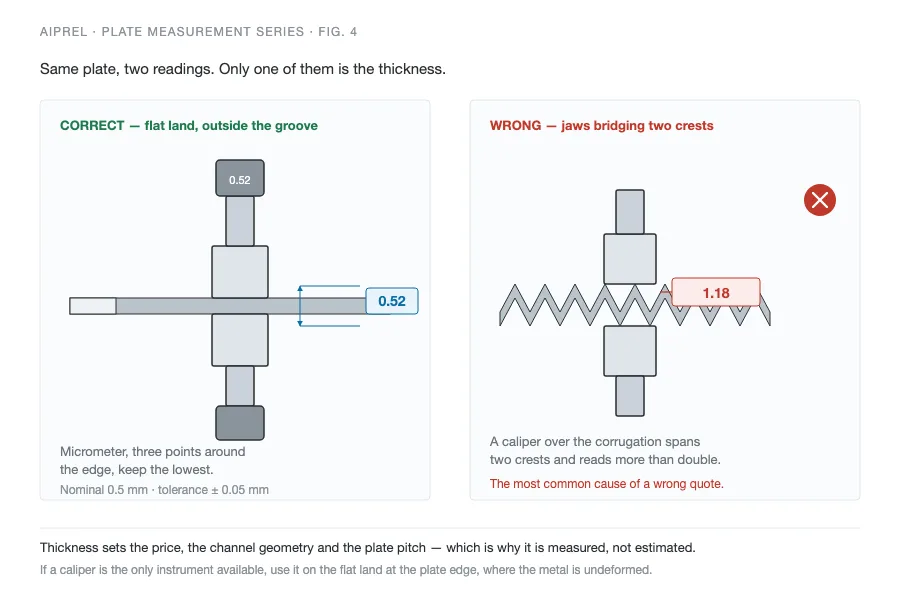
Use a micrometer, not a caliper, and measure on the flat edge outside the gasket groove. Take three readings around the edge and keep the lowest.
A caliper closed over the corrugation spans two crests and reads 1.0–1.3 mm on a plate that is actually 0.5 mm. That single mistake causes more wrong quotations than any other, because thickness drives the price and the channel geometry at the same time. If a caliper is all you have, use it on the flat land at the plate edge, where the metal is undeformed.
Gasketed plates are normally 0.4, 0.5, 0.6, 0.7 or 0.8 mm, with 0.5 and 0.6 covering most industrial duties and titanium usually at 0.5 or 0.6. Tolerance is around ±0.05 mm, which is why the micrometer matters.
Three things follow from the number. It changes the plate pitch: a 0.6 mm plate in a pack designed for 0.5 mm narrows every channel, raises velocity and pressure drop, and can leave the pack unable to reach its tightening dimension. It is a fair indicator that the plates were once replaced on price — a 0.4 mm plate in a seawater duty is a decision someone made to save money, and it is usually why the unit now leaks. And it tells you whether plates from two batches can be mixed. They cannot, if the thickness differs.
Measurement five: corrugation angle and channel depth
The chevron is the part of the plate that does the heat transfer, and the part catalogues describe least clearly. Two numbers matter: the angle of the chevron to the plate’s long axis, and the depth of the corrugation.
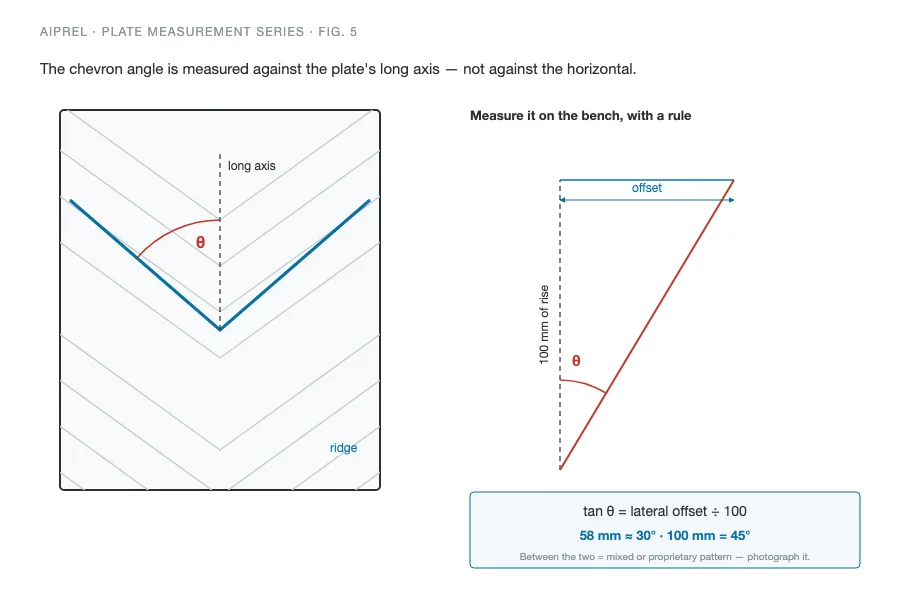
The angle. Industrial plates cluster around two families — roughly 30° (“soft” or low-theta) and roughly 45° (“hard” or high-theta), with mixed packs alternating the two. You do not need a protractor if you have a straight edge and a ruler. Lay the plate flat, run the straight edge along a single ridge, mark 100 mm of rise along the plate’s long axis, and measure how far the ridge travels sideways over that 100 mm:
tan θ = lateral offset ÷ 100
An offset of 58 mm is 30°. An offset of 100 mm is 45°. Anything in between is a mixed or proprietary pattern, and it is worth photographing rather than describing.
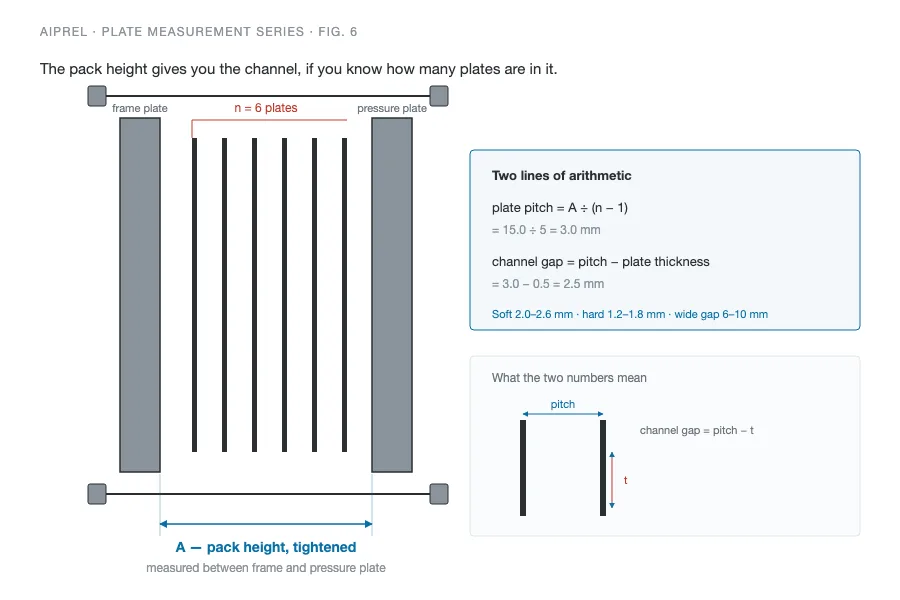
The depth. If the unit is assembled, measure the tightened pack height between the frame plate and the pressure plate, divide by one less than the number of plates to get the pitch, then subtract the thickness:
A 0.5 mm plate on a 3.0 mm pitch gives a 2.5 mm channel. Soft plates typically run 2.0–2.6 mm, hard plates 1.2–1.8 mm, wide-gap units 6–10 mm. If the unit is open, measure corrugation depth directly with the depth rod of a caliper against a straight edge laid across the plate.
Angle and depth together decide turbulence, and turbulence decides both the heat transfer coefficient and the pressure drop. This is the difference between “it fits” and “it works”: a 45° plate dropped into a pack designed for 30° will bolt up perfectly, pass a hydro test, and then either over-pressure the circuit or fail to reach duty. Neither outcome is obvious on the day of installation, which is why this measurement is worth the twenty minutes.
The record sheet
Fill this in as you go and send it with the photos. Suppliers who receive a complete sheet quote in a day; suppliers who receive “it’s about 900 mm long” quote after four emails.
Dimension
How to take it
Tolerance
What it decides
A — horizontal port centre distance
(outer span + inner span) ÷ 2, on a plate
±0.5 mm
Fit. Eliminates most wrong sizes immediately.
B — vertical port centre distance
Same method, other axis
±0.5 mm
Fit. Distinguishes sizes with the same width.
Port hole diameter
Two readings 90° apart, take the smaller
±0.5 mm
Fit. Determines whether the gasket has a sealing land.
Plate width
Overall, and gasket-line
±1 mm
Fit.
Plate length
Overall, gasket-line, corrugation field — all three
±1 mm
Fit. The most common source of wrong quotes.
Plate thickness
Micrometer on the flat edge, three points, lowest
±0.05 mm
Performance and price. Sets the channel and the pitch.
Chevron angle
Offset over 100 mm of rise; tan θ = offset ÷ 100
±3°
Performance. Duty and pressure drop.
Corrugation depth / channel gap
Pack height ÷ (plates − 1) − thickness
±0.2 mm
Performance. Confirms the plate family.
Plate count
Count plate edges at the top of the pack
exact
Order quantity, and a check on the channel calculation.
Gasket type
Clip-on or glued; groove width and depth
—
Decides whether the pack can be re-gasketed in place.
Lug and notch position
Distance from plate edge to lug centre; notch side
±2 mm
Fit. A wrong notch hangs the plate at an angle.
Connection size and type
Thread or flange, measured on the frame
—
Usually adaptable, so check it last.
Which numbers are fit-critical and which are performance-critical
The distinction tells you what to re-measure when something does not add up.
Fit-critical: port centre distances, port hole diameter, plate outline in both directions, lug and notch position, gasket groove profile. Get one wrong and the part does not go in — which is the good outcome, because you find out immediately.
Performance-critical: plate thickness, chevron angle, corrugation depth, plate count. Get one wrong and the part goes in, seals, and then underperforms or fails months later. This is the expensive category, and the one people skip because the unit “looks right”.
If two candidates both fit, the decision is made on angle and thickness, not on outline.
The trap: same outline, different plate
Plates from different makers can share an outline and port spacing to within a millimetre and still not be interchangeable. The corrugation angle differs, the groove profile differs, the thickness differs. Drop one into the other’s pack and you get a leak within a week, or a pressure drop nobody can explain.
We see it most often after a shutdown where two batches were bought from two sources to save time. The rule has no exceptions: never mix plate makes within a single pack. Replace in complete sets and keep spares from one source.
Gaskets are more forgiving. One supplier’s gasket frequently seals another’s plate, provided the groove profile and port cut-outs match — which is why a gasket is the safe first purchase on an unidentified unit, and the plate is the one to confirm against a drawing. If the pack needs both, buy them from one source so responsibility for fit sits in one place.
What we ask for, and why
When a customer sends measurements for an unlabelled unit, the reply is nearly always the same five questions. Having the answers ready turns a week of email into one exchange.
A photo of the whole frame, and a close-up of the plate corner stamp — even if it looks blank.
The four numbers: A, B, port hole diameter, plate thickness.
The duty: media on both sides, operating temperatures, flow rates. This decides whether a 30° or 45° plate is correct, and it is the question most enquiries cannot answer.
Quantity, and whether the pack is being fully re-gasketed or only partly.
The original tightening dimension, if anyone recorded it before the pack was opened.
With those five, a plate family can usually be confirmed against the model library the same day. Without them, the supplier is guessing, and a guess that fits is still a guess.
Three cases where measuring does not work
Deformed plates. A plate bowed by over-tightening or water hammer reads 3–8 mm long. Measure a plate from the middle of the pack, never the two end plates. If every plate is dished, the unit has been run over-pressure and the measurement will mislead you — note it on the sheet rather than averaging it away.
Brazed and welded units. No gasket, no serviceable pack, so plate-level measurements are unavailable. Identification runs on outline, port size and connection type, and the replacement decision is a whole unit rather than a part. Do not spend an afternoon measuring a brazed block.
Obsolete series. The model number may be recoverable and the tooling long gone. Then the real question is not “what was it” but “what fits the frame now”, and the frame constrains you to plate families with the same port spacing. That conversation starts with A and B, not with the nameplate.
Questions we get asked
Can I identify the model from the frame dimensions alone? Only roughly. Frame length changes with plate count, so two units of the same model can differ by 300 mm overall. Use the frame to confirm a candidate, never to find one.
Is the model number the same as the plate type? No. One frame usually accepts several plate types — different angles, different thicknesses — and the plate type is what a replacement is quoted against. This is the most common confusion in enquiries, and why a frame model alone often cannot be priced.
How accurate do my measurements need to be? Half a millimetre on port distances and outline, 0.05 mm on thickness, 3° on the chevron. Better than that is wasted effort; worse produces a wrong quote.
Do I have to open the pack? For outline, ports and the corner stamp, no — work from the end plate. For thickness, angle and plate count, yes. Budget half a day for a mid-size unit, and order gaskets before you open a pack that has been in service more than five years, because a gasket that comes off rarely goes back on.
What if the plate has no markings at all? Then the measurements are the identification, and photographs of the plate face, the corner and the gasket groove do the rest. A supplier who has seen a few thousand plates will recognise the family from the corrugation pattern faster than from any number.
Send the sheet, not the guess
If you are holding a frame with no tag and a pack that needs plates before the next campaign, send the record sheet and four photographs — whole frame, plate corner, corrugation close-up, gasket groove. You can upload them on the contact page with the duty noted in the message; a photo of the old nameplate, even a damaged one, shortens the reply by a day. Our engineers will come back with the plate family, the gasket compound and the lead time, and say plainly if the frame is beyond re-plating. Replacement plates in 304, 316L, titanium, SMO 254 and Hastelloy are covered on the plate page, including the thickness and angle options the measurements above are meant to pin down.
Get In Touch With Us
Need pricing? Need samples? Need support? Talk with our team in 24h.